TL;DR: This machine is very light duty as far as cutting goes, and the tolerances leave something to be desired (but it’s way WAY better than not being able to use one). i3Detroit is currently in the middle of a fundraiser to help expand into the second half of our building, and part of that expansion involves buying some new tools that we now have space for. We have decided that upgrading this machine beyond what I have listed at the end would be a waste as we could buy a new machine that would be more reliable, sturdier, could take bigger cuts, and is more precise for the money it would take to upgrade this one. We are hoping to get at least $50k raised by October in our fundraiser, because if we do the Michigan Economic Development Corporation will match that $50k to help with out expansion. Even though this machine will ideally be operating as a wood router for less than a year, it will likely live on as a CNC plasma cutter considering the side forces for that tool are pretty much zero.

I am classifying this one as an antique even though I have used hardware older than this when it was new. The cnc router craze is relatively new as far as manufacturing processes go and this one is downright archaic compared to what I am used to seeing. It uses steel cable and turnbuckles for the drive and quadrature encoders and ball chain for feedback. Looking at the design was kinda surreal:
I’m a member of a makerspace known as i3Detroit, many of my previous hacks have been done either in service of them or at least using their facilities. We recently received this old CNC router for free, but the catch was that it didn’t work. There are several reasons it didn’t work, but the one I’m tackling is the electronics. A CNC router is no good if the computer can’t talk to it, and that’s the problem we have here.

The computer we got with it is an old socket 7 box with a 2GB IDE hard drive, 16MB of ram, and a 110Mhz Cyrix 6×86. The really odd thing is it has two BGA chips onboard, 4 PCI slots, 3 ISA slots, spots for SIMMs, DIMMs, and onboard IDE. Happily enough it powered up and we were treated to Windows 95. In the documentation there was talk of a licence for Engravelab and the number in he documentation matched what was plugged into the parallel port of the machine. There were also two serial ports and one of them was occupied by a serial mouse, I couldn’t figure out which port the mouse was hooked up to but when I tried to talk out one of them the mouse stopped responding: mystery solved. With the serial ports labeled we could now try to use the software on the machine to try to plot something on the CNC router. That inevitably led us to our second problem: the CNC controller.

The controller for this particular machine was housed in an old AT computer case and the power supply was shot. I have no doubt we could have brought it back, but for now we dropped in an ATX supply and I wired the green wire and a ground wire to the old alternate action switch which used to switch the mains. We now have a functional power supply. There are no indicators that it’s on however. The case that was repurposed to hold this CNC controller still had the entire complement of front panel LEDs and buttons and only the power LED looked like it had been touched.

Let me take some time aside here to ask, why would anyone ever need to wrap the LED and button wires in a ferrite core? is the old computer that sensitive to interference picked up by a foot long wire? It’s not like there are fast signals running to those LEDs. Ok, back to the repair.

The power LED was burned out, but this manufacturer terminated the LED side of the header wire with a two pin polarized 0.1″ spacing jack (2 pin fan connector jack to me) and just slid the LED in. I could see that the green LED was burned up, so I swapped in another one, added a current limiting resistor and now we have a power indicator.

“We applied the cortical electrodes but were unable to get a response from either patient”
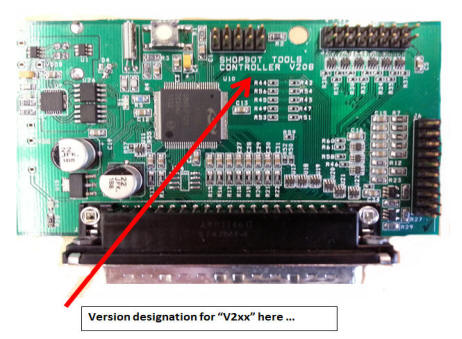
The next issue is the controller itself, It is an 80c32 dev board by Blue Earth Research called the XPLOR 32 and has a frickin’ DC-37 connector for all of the I/O and power (I love them already…). This controller has a rom on it labeled “ShopBotControls Ver. 8 0420980000204” and from their website it seems that Shop Bot has had many generations of controller that kept this DC-37 connector. The board it’s attached to is a generic breakout and I have pinned it out entirely along with noting where the connections to the encoders and stepper drivers go. In doing this I noticed that the DE-9 serial port that we had hooked directly up to our PC was passed straight to the 80c32 without a level translator. Is that cool? I don’t know but that’s how it’s wired. When trying to connect the software to this module it would do things on the correct serial port (we had an LED indicator on it) but we got no response.

The final mystery was the stepper controllers. They’re not really controllers, more like drivers. The SLA7026M have virtually no smarts in them except current regulation and take quadrature signals raw to drive the windings of the motors. This means no step and direction signals which is what most CNC controllers want to output. This was the part that took the longest and I kept double and triple checking the wiring each step of the way. I borrowed a design for step and direction to quadrature from this post. Even in the initial question he’s asking if there’s an easy way to make the circuit better, but for me it’s good enough to start cutting. I was feeling a bit brain-dead so rather than staring at it for an hour and not being sure it would work I went on logic.ly and modeled it. I have to say, that was a very easy tool to prove to myself that the circuit would work. I soldered in 5 sockets and then noticed that the chips wouldn’t fit that close together, so I belt sanded the chips to fit and kept on.

I really like how the circuit works. You’ve got two XOR gates and two D latches. The output of each XOR is connected to the data pin of each latch, so whatever it evaluates will get read in when the circuit is stepped. The step pin is connected to both clock pins on the latches so every step the circuit re-evaluates and the states change. One input of each latch is connected to the direction pin, which swaps what polarity the other pin needs to trigger. The other pin is connected to the output of the other latch, meaning that one latch only changes state a cycle after the opposite latch changes state. For one of the XOR gates it’s connected the the Q output on the latch, but for the other it’s connected to !Q meaning that the state changes are always happening on the opposite polarity. The normal and complementary outputs of each latch are used to drive the full quadrature so you don’t even need not gates on the output. I find this quite a nice and compact circuit to solve this issue.

they’re socketed, sure, but you’ll have to sand the new chip down to make it fit
With all the custom stuff done I just had to grab an arduino mega and flash it with grbl-mega, it then happily talked to me over GrblPanel. Soldering up those step and direction wires to the shield I competed the custom electronics to make this thing drive. Now, does it work?
Does it ever! There are of course remaining tasks to be done:
- Re-string the steel cable to make the X axis move
- Find a way to use the quadrature encoders on the X and Y axes
- Add endstops for homing
- Add endstops at the other end to prevent crashing
- speed control of the spindle?
- rebuild the spindle (bearings? brushes?)
That being said, the only thing that stops it from making cuts is the first point, so that’ll be the next one to tackle. And if I’m really feeling like a smartass I’ll put a max232 on that shield and you can use the controller just as it was originally (I think), but this time it’ll take straight g-code.

August 11, 2019 at 4:55 am |
Too late now, but LinuxCNC can output the raw step patterns that your stepper drivers need. Either through the parallel port or using one of the supported FPGA cards from Mesa.
You might even be able to run it on the same PC hardware, though I think that would be a project in itself and not worth the trouble.
August 11, 2019 at 6:50 am |
[…] [Evan] has a ShopBot CNC wood router from the mid 1990s that he describes as an antique, and his tale of its restoration is both a fascinating look at the changes in small-scale CNC control over two decades as well as […]
August 12, 2019 at 11:24 am |
[…] this in mind, they went to work troubleshooting and reviving the system. The first controls component addressed was a 110MHz Cyrix 6×86 computer with 16MB of RAM, and […]
August 12, 2019 at 12:31 pm |
[…] this in mind, they went to work troubleshooting and reviving the system. The first controls component addressed was a 110MHz Cyrix 6×86 computer with 16MB of RAM, and […]
August 12, 2019 at 4:20 pm |
[…] appeared to be in operational condition, plus it had a large work surface. The decision was made to get the CNC up and running for now, with the eventual goal of turning it into a plasma […]
August 12, 2019 at 4:30 pm |
[…] appeared to be in operational condition, plus it had a large work surface. The decision was made to get the CNC up and running for now, with the eventual goal of turning it into a plasma […]
August 12, 2019 at 9:46 pm |
[…] appeared to be in operational condition, plus it had a large work surface. The decision was made to get the CNC up and running for now, with the eventual goal of turning it into a plasma […]
August 12, 2019 at 11:06 pm |
[…] appeared to be in operational condition, plus it had a large work surface. The decision was made to get the CNC up and running for now, with the eventual goal of turning it into a plasma […]
August 15, 2019 at 11:54 am |
[…] appeared to be in operational condition, plus it had a large work surface. The decision was made to get the CNC up and running for now, with the eventual goal of turning it into a plasma […]
September 9, 2019 at 10:32 am |
Hello If you would like to sell any of the Shopbot or Blue Earth boards please write chuck@pegheds.com