For the longest time I have been using my main desktop computer as my file server. This comes mostly from the fact that I never upgraded my computer until enough of it died that it needed a whole new motherboard/CPU/RAM upgrade because I didn’t have any spare parts to revive the old one. The problem with having a several terabyte file server full of NFS and Samba shared media as a dual boot environment gaming rig is that if I rebooted into Windows then no one (including me) could access the files. I could have set up the Windows partition to share the drives as well, but Windows doesn’t really like EXT3 or NFS and I don’t like administering windows if I don’t have to. This resulted in me playing no games (which is arguably not all that bad of an outcome) but I would like the option of playing something and then watching something streamed to my phone or laptop from my server without rebooting.
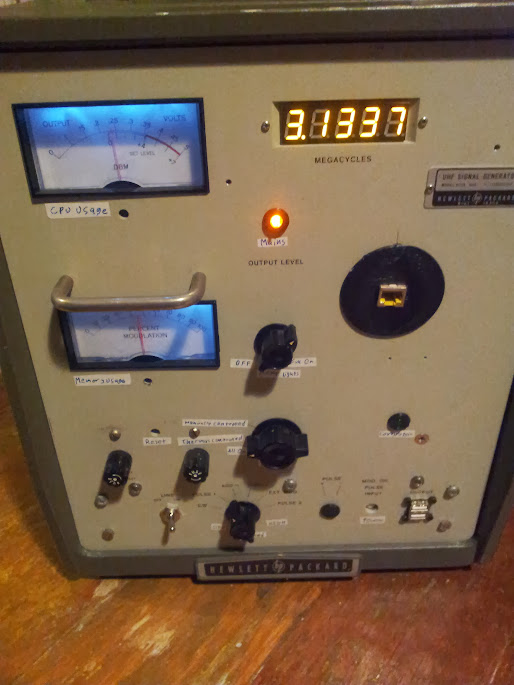
When Michigan Tech decided to gut and throw out an old HP 612a UHF signal generator I had to jump at it (they also threw out the VHF equivalent, but I hadn’t decided what to do with the one I had yet). A friend suggested that I build it into a server and I took on the project after making a few measurements. The bottom of the case where all the passive components and wiring went (remember this thing once held tubes) was just barely tall enough for an intel lga775 stock heatsink to fit, and the power supplies (because of course I had two) would mount just fine if de-cased first.
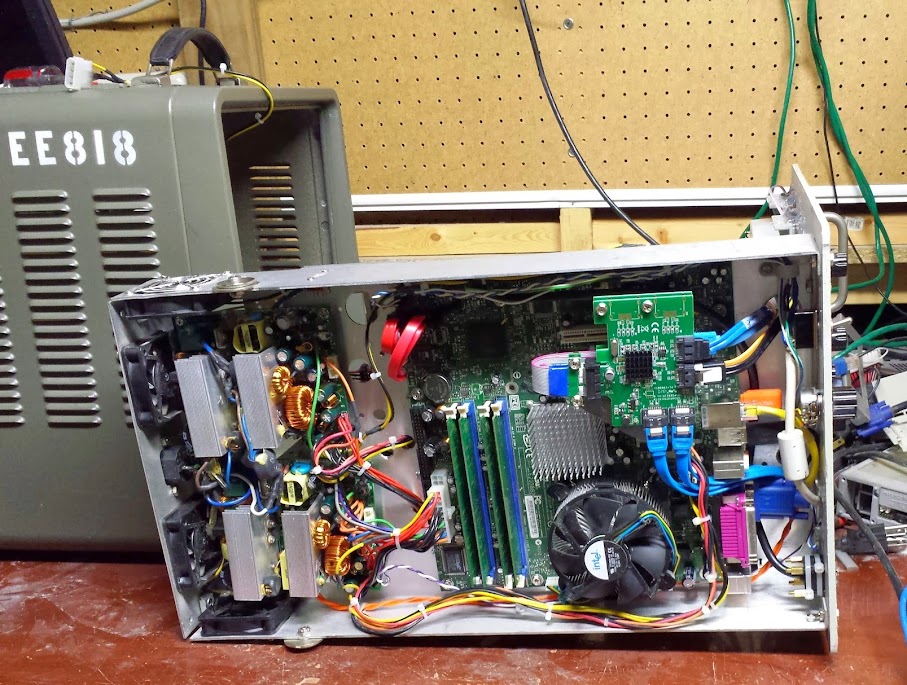
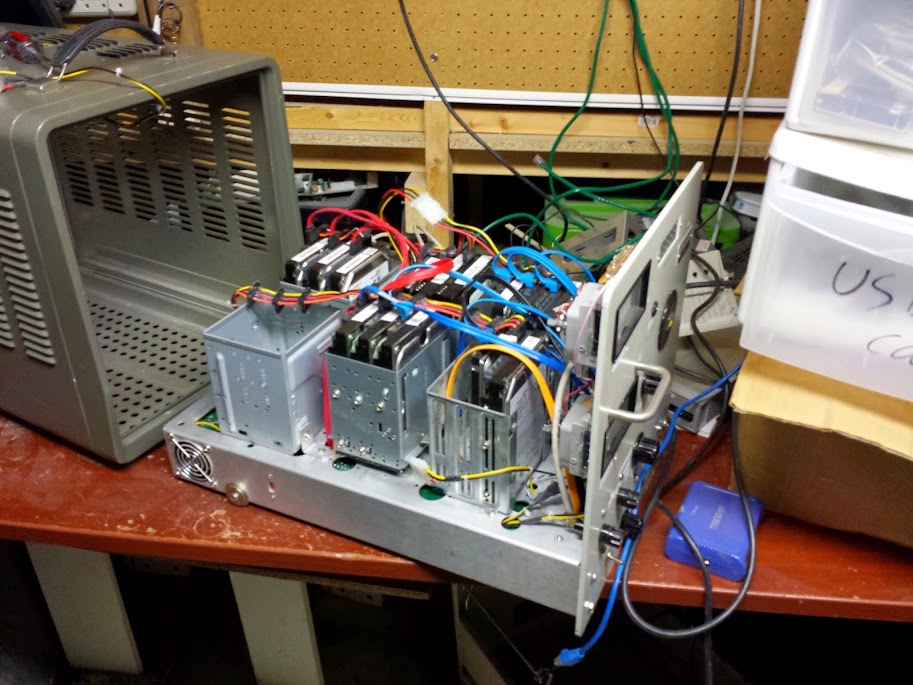
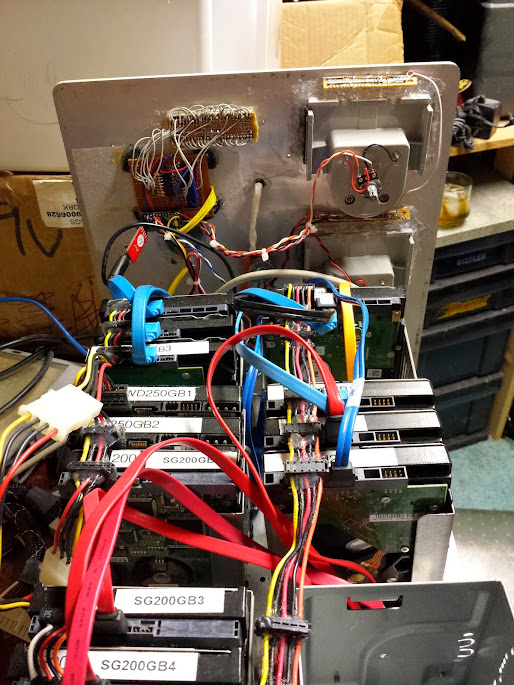
The case itself had some amenities. It had a power plug, it had a 115/230 switch, and it had a roll out tray design. This means that the computer can roll out of the housing while it’s being worked on which makes for great benefit in troubleshooting. I cut off all the offending steel (not a lot) and added fan holes for the power supply cooling (not terribly well centered). I got some semi-matched 3-bay 3.5″ cages from scrap computers and mounted them to the main body with brass sandoffs (a friend had a HUGE bag of these). The holes for the power supply mounting and motherboard mounting are more-or-less standard so when it came time to… upgrade them it went fairly smoothly (upgraded specs mobo/CPU won’t change boot sequence making it’s sata ports useless and old power supplies blew up with PWM-ed load on the 12 volt rails).
that drink might be whisky, I don’t remember..
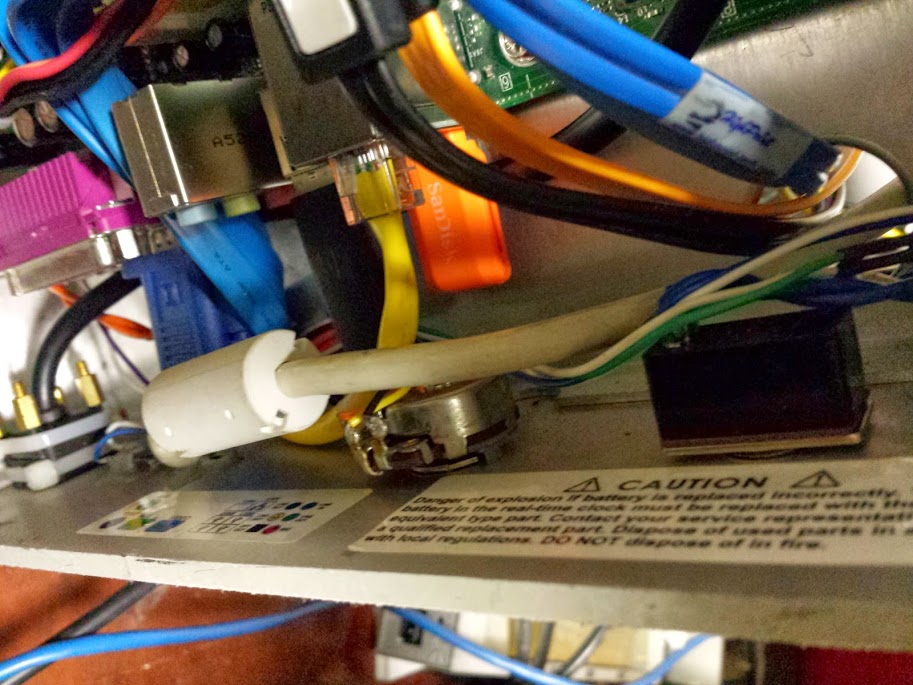
The computer booted off of one of the cheapest USB flash drives I have ever seen. This drive had a PLASTIC housing, not a metal one, probably meaning pretty bad sheilding, but it works just fine and is a sandisk so it’s probably ok. Two USB ports were located to the front panel for ease of interface, the VGA cable is permanently connected, but coiled up inside only to be taken out when troubleshooting. The network cable is also patched to an external mounted jack, it’s hand-soldered to a board mount jack, so the signal is probably not the best but it’s not a gigabit NIC anyway and I’ve pushed near 100Meg speeds through it.
The two power supplies have their green (power on) and ground (black) wires in parallel, but the rest are floating relative to each other. This doubles the number of 12 volt and 5 volt rails available however the motherboard is exclusively using one supply. The cables at the supplies have been de-soldered and I pulled from my extensive collection of Molex and SATA connectors to put together a nice harness for this machine. The fans are mostly dumb 12 volt computer fans so they are controlled through PWM-ing the power rather than the new ‘4-wire’ fans that have a logic-level PWM input.
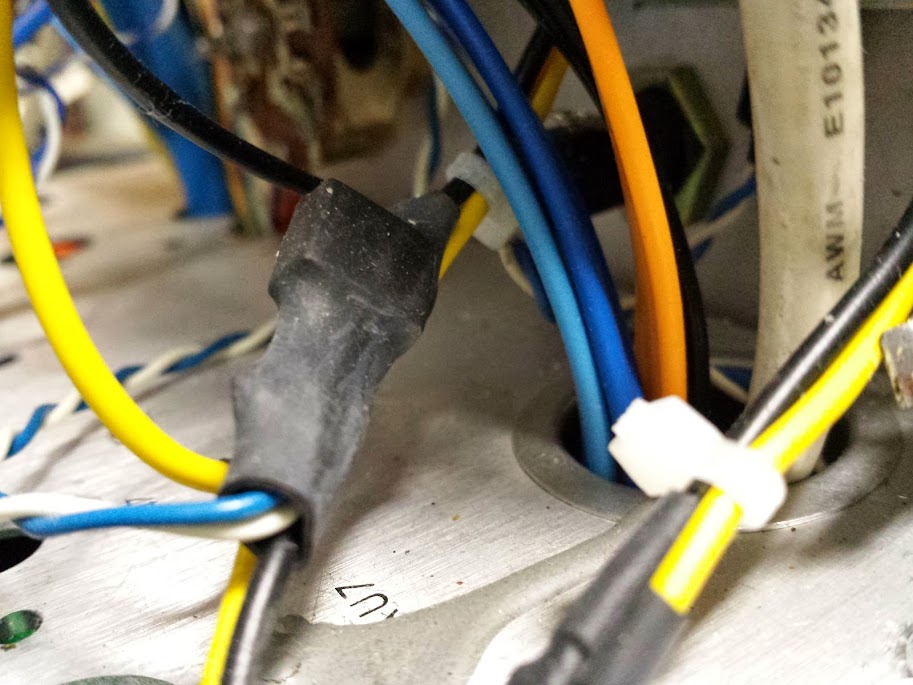
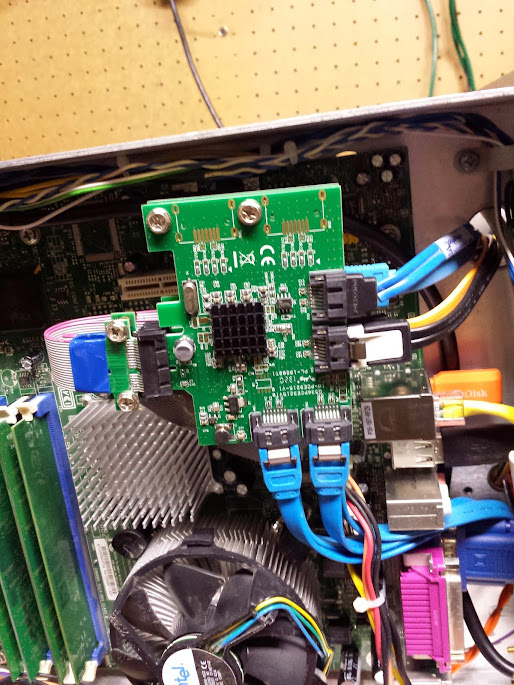
The motherboard did not have nearly enough SATA connectors for my taste so I ordered 2 PCI-E 1x 4-port SATA cards and sone PCI-E 1x ribbon cable extenders. Here is where some people may complain about signal integrity over un-sheilded ribbon, but I will state again that I have had no instability in this server since it was constructed. The power and reset buttons are on the front panel along with a mains power switch that cuts the power to the supplies killing the whole rig and an ne-2 neon tube that shows the presence of AC power after the switch (tells you if it’s not plugged in or otherwise is without AC). The fuses for the power supplies have also been run up front.
The custom part of this server that makes it more than just a case mod is in the font panel controller. There is an arduino pro mini controlling the front panel, acting as a gauge driver and a fan controller. The fan controller portion is simple, the fan power bus is switched by a big FET pulled from the power section of an old P2-era motherboard and that FET is controlled by the arduino. The fan speed can be either full on, manually controlled, or temperature controlled. The temperature comes from a thermistor (salvaged from a power supply) that is biasing a voltage divider read by an analog input. If set to temperature controlled a PID controller tries to keep the center of the machine below 80F. This frequently means the fans are always on, but that changes based on where the server is placed for cooling. The manual control is exactly what it sounds like, an analog voltage read from a potentiometer is converted to a PWM duty cycle. The mode is controlled by a rotary switch that has various resistors running into one analog pin to minimize pin count (and it was an odd pinout switch).
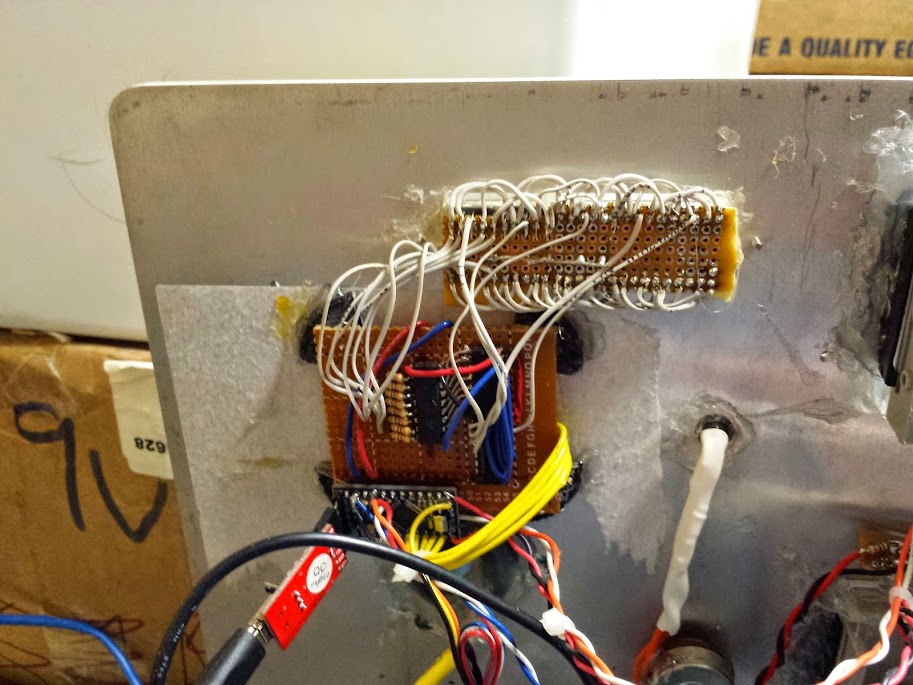
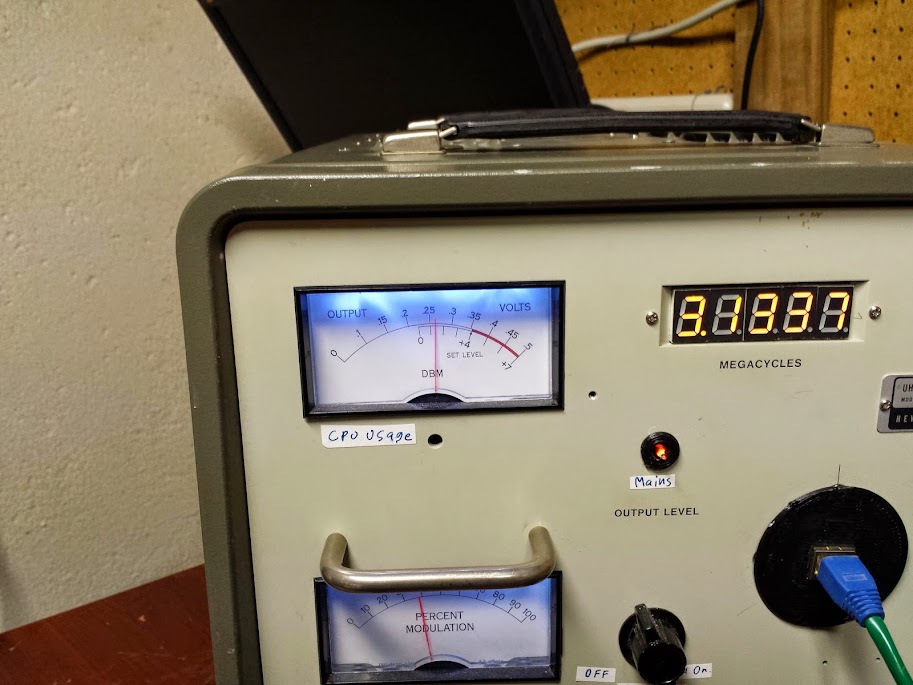
The big part of the front panel is the meters. There are two beautiful meters that I have backlit (and the backlight is on an analog voltage control by potentiometer) and a 5 digit 7-segment display meter that fit perfectly where the old wheel didin the front panel. The digital displat sows exactly what it originally did, ‘Megacycles’. In this case meaning the current CPU clock speed (which is governed) in Megahertz. The two analog meters show the RAM and CPU usage and have trimpots on the back to set the scale, well, they’re pots anyway… Commands are given to the controller over a USB to serial link (knock off FTDI cable) and a python script. The Script was originally bash with a bit of python because I’m bad at bash math, but it became python with a bit of bash because it’s marginally faster (unless I could run the whole thing in bash).
Because this server is running headless I wanted to make sure it came up and shut down correctly, the way I did this was to make a script that played music using the ‘beep’ command and set it designated on startup, and another on shutdown. It’s actually fairly easy to get your scripts to launch like any other daemon in linux using this tutorial.
There were a lot of parts for this I modeled in Solidworks and 3d printed because it’s really easy to make LED and button holders that way for oddly shaped holes. The scripts, arduino code, and solidworks files are on my github here and all the pictures in this post (along with others) are here.
